Friday, September 30, 2011

Cowboys!

I needed to create a baby quilt for a sweet little boy last week, and... you know, we don't do a lot of boy stuff around here! It's usually girly, girly, girly...
And I wanted to use my stash, so here's what I came up with.
I love those cowboys.

And I wanted it to be "monogrammed" but subtle, so I quilted the little guy's name into one of the blocks.

I especially like how well the clouds worked as a binding.

I have a lot of projects that I've neglected to blog about, so I'll be putting those up in the next few days.  Stay tuned!

Thursday, September 29, 2011

Get thee to Target!

So I have 2 quilts I'm working on, and both have come from this palette.
I can't show them yet because they are both wedding gifts....  but stay tuned, cause they are fun!
The tops are pieced, so now I'm in the market for backings.

And today I ran across a DEAL I had to share:
Target has some sheets that are 100% cotton.  I got the set for $9.98 and I'm going to use the 2 sheets as backs for my 2 blue quilts.  That's less than $5 per backing, and I don't have to piece anything!  
(Happy Dance)
Also, it comes in this cute little velcro pouch:

I think I'm going to put straps on it to be a backpack for my 2-year-old.
And the pillowcase?  It's going to become a pillowcase dress for my 4-year-old.
Also, while I was there, I ran into this:

And since my 2-year-old is obsessed with all things elmo and the price was this:

he had to come home with me.  He's hiding in the closet until Christmas.


In case you're interested, here's the details on the sheet sizes. I'll use the top sheet for the larger quilt and then cut the elastic part off and use the fitted sheet for the smaller one.

Saturday, September 10, 2011

Rainbow Melt

I saw this amazing rainbow idea here and knew I had to use it as a starting point.

But I didn't want a plain canvas!  I was going to use it in my sewing studio, which also doubles as my daughters' craft space.  So I figured out a way to combine those thoughts.....

I purchased 3 11" x 14" canvases in a pack for $5.47 at Wal-Mart.  They were not traditional canvas depth, they were mostly flat, which I liked.  And I liked the price. And I didn't want to make another stop, so into the cart they went!

I took a Sharpie and "took a line for a walk" around the canvas to break up the space.  And then in each one, I filled in a machine quilting design.  For inspiration, I trolled around Leah Day's Free Motion Quilting Project site and found lots of ideas!  {If you haven't seen Leah's work, it's amazing! She has wonderful instructions and videos for over 300 machine quilting designs.}
Just to save some time (and work) I marked off where the crayons were going to cover at the top and left that part blank.
I hot glued the crayons on.  Actually, before that I arranged them in approximate order.  My youngest daughter really wanted the white one on the left side (and she's 2, so I left it there!) so I put the black one on the left to balance it out.  All of these came out of a box of 64 crayons.

Then, the exciting part!  We got out the hair dryer, took it outside and melted it!
I love how it turned out!

Just a few tips in case you are going to try this:
It doesn't take long to get the wax to melt, and yes a hair dryer will work.
But it's messy.  And I don't say that lightly.  I am used to my projects making a big mess!
But the wax kind of flies around, so be aware of your clothes, your surface, your shoes, etc.  
They might get splattered.

Sunday, September 4, 2011

what to do with orphan blocks?

I have amassed quite a collection of blocks without a home.  Extras I made, experiment blocks, blocks that didn't turn into quilts, blocks that got ripped out of quilts, etc.

I have seen some quilts in blogland where someone has just put all their orphan blocks together into a quilt and magically they look nice.  I am not sure that will be the case here.  I laid all of them out on the floor (I had more than I thought!) to kind of get an idea:

Now they are all different sizes.  Here's the possibilities I'm considering:

a.  realize it may not be cute and abandon idea.

b.  cut blocks into some set size.  put borders on smallest ones and cut largest ones down or into pieces

c.  assemble it like a jigsaw puzzle, leaving most of them the current size but cutting the biggest ones down into a few pieces to spread them out a bit.

What do you think?  Some of these blocks I'm a bit attached to.  There's pieces of my daughters' baby quilts in there, quilts I made for friends, etc.  I also thought about making some more blocks from scraps leftover from especially special quilts I've given away, thus allowing me to keep a little piece of that quilt.  But I'd like to hear your opinion.

Also, thanks for your feedback on garment making!  Thanks to your really excellent feedback, I now have a project in the works, and I'll be telling you more about it this week.

Thursday, September 1, 2011

Spooky Cat Quilt

I have the privilege of showing you guys a quilt I machine quilted for Anita last week.
Please note: I didn't piece this quilt. I only quilted it.  I don't want to ever appear to take credit for someone else's work.
 Isn't it beautiful! She brought me such a cool piece to work on.  It was quite inspiring for me.
We decided on green thread that would match the wool eyeball applique.  Since the background varied a lot, I thought the green would be a happy medium.  Turns out it was a good choice!
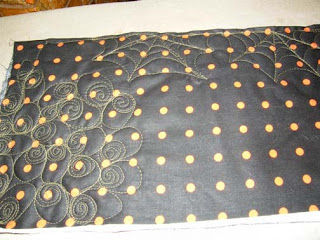
I showed her a quick mockup of some quilting designs I thought would be nice for the background of the kitties.  The left is snail shells, and the right is eyeballs.
We went with the eyeballs, and as I was basting it, I decided to ask if we could do spiderwebs on the border.  And she thought that would be nice, so we were off and running!
Here's a closeup of one of the corners.  You can see that the eyeballs looked neat in the background, but I am awfully partial to the spiderwebs!

I liked how the green really popped on the different colors.
 The green and purple combo was my favorite.
 and I liked how the spiderwebs could be entangled in the corner applique.
All in all, it was fun.
and here's the finished piece.