Thursday, May 27, 2010

Here's what I'm working on today...

So this quilt has a deeply personal meaning to me. I don't usually name my quilts, but this one has a name. If I can find the guts, I'll tell you all about it when it's finished.

I'm intending for it to be a wall-hanging to go over my sewing table, but we'll see. I can't decide if I'm a wall-hanging kind of girl. But I have this giant wall there, and it's visible from the living room so it's not a design-wall area really. So, wall hanging it is!

Saturday, May 22, 2010

WINNERS!!

Well, the Sew, Mama, Sew! Giveaway was lots of fun.

The winner of the hodgepodge is:
I♥thesecrazykids said...

I'd rather win the hodge podge! In general I like the sock monkeys better...but then I got to thinking about the beets. What a great layer they would make for a gardening bag!

Kim said...

I would definitely make a charm bag. I love the fabric. The quilt you made looks beautiful.

Sunday, May 16, 2010

Giveaway day part 2!

Welcome to giveaway day part deux.
So here's what I'm curious about.... would people rather win a very planned and organized, matching charm pack a la giveaway day part 1, or would they rather win.....
A HODGEPODGE OF RANDOM FABRIC OUT OF MY STASH!!
That's right ladies and gents. You can win this random assortment of (mostly, but not all) selvedge to selvedge cuts of lovely fabric from my stash.
All are at least 2" wide.
(Personally I'd rather win the hodgepodge, but that's just me...)

You'll be getting several of my favorites including the sock monkeys, the beets, and the jelly beans. And the crows, well I bought them thinking how interesting they are, but I can't figure out anything to do with them that isn't going to be a little creepy.

To enter: tell me one of the following (or all. whatever. it's up to you.)

(1) what to do with the crows fabric. I have 2 yards minus the cut I'm giving away. so a bunch.
or
(2) if you'd rather win the hodgepodge or the charm pack
or
(3) what you'd do with the hodgepodge
or
(4) whether you like the sock monkeys or the beets better.

To enter a second time:
become a follower and leave a second comment telling me, or if you are already a follower, just leave a second comment telling me.
I'll close the entries on the 20th at 5pm central time.

And you might want to check out giveaway part 1......

Thanks for stopping by!

Giveaway day part 1!

For giveaway day, I'm trying an experiment. I'm doing 2 giveaways.

Here's the first one:
It's a charm pack of Moda's Tranquiltity line. I bought 2 of these and used one to make this quilt for my grandma-in-law. And so I'd love to share the second one with someone else!

To enter: leave a comment telling me about what you'd use it for.
To enter a second time: become a follower and leave a second comment telling me, or if you are already a follower, just leave a second comment telling me.
I'll close the entries on the 20th at 5pm central time.

And you might want to check out giveaway part 2......

Thanks for stopping by!

Fracturing blocks tutorial

I've been on a kick lately of making blocks,
then slashing them up, and putting them back together.
It's fun! It's suprising! It changes the whole look of the block! Love it.
I like this one since it allows me to add the yellow into a traditional block.
This one was for a quilting bee, and I wanted to add something suprising into the center block.

Anyway, it's not difficult to do, but it does take some practice to figure out where is going to give you the best results. It's more challenging to cross seam intersections with the slashes and make the seams line up afterwards. I'll offer this advice: the more narrow you can make the slash, the less distortion you have afterwards, and it looks more like the slash is floating within the block.

So I wrote this tutorial on creating X's or slashed in a block for a quilting bee, but then I decided not to use it. But it's a fun block that might be interesting for everyone else as well... so I'm posting it anyway! It's written for starting with a 9-patch block, but the block you are starting with doesn't really matter at all.
You can use the method in so many ways!
****************
First, start with a 9-patch block. For the bee, the blocks are 3.5" square. On the diagonals, I used prints or solids that are COOL colors, so green/blue/purples.

For the other blocks, I used black, white, grey or any black/white/grey tone prints.

{I really should mention that I'm using 2 different blocks to create this tutorial. Apparently I got some shots on one and some one the other but not all on either one. sigh.}

So, sew together your 9-patches and let's get ready to fracture them:
First, use your ruler not to measure, just for a straightedge. Choose any diagonal and cut it. That's right, just cut right through it with wild abandon!
It's going to look something like this.

Next, take your yellow or orange scraps and cut a piece about 11" by 1 to 1.25" and sew it to one of the sides using a 1/4" seam. Press it. Then set your block back out and line everything up at the top.
See, the orange strip is sewed to the left side but just lined up on the right.
Carefully lay it over and pin. I like to use my cutting mat as a guide so that I know where to line up that top edge.
Sew and press. Lookin' good!
Now slash it again, but going the other way. However you want.
Sew another 11" by 1.25" piece to one side. Press.
Line it back up, then lay it over and pin it to sew.
Sew and press.
Awesome!
And trimming is always helpful....
Here's another one. These trim up to about 9.5" square. It's easy to adapt the tutorial for a larger block by just using larger squares. And if you use a 1" fracture with 1/4 seams, then you won't change the size of the block you started with before the deconstruction.

Opinion please.....

So I've been working on this quilt.....
forever, it seems like. Blogged here and here.
I've ripped out more seams on this goofy thing.... {sigh}

And it actually has 2 more borders now that what is pictured here, but I'm far too lazy to get an accurate picture of it. You can imagine, right?
It has a 5" border of the music notes, then a 4.5" border of the black dots. It's an oversized queen quilt, for my bed.

And since it's already been the Quilt Of Disasters so far, I'm terrified to quilt it. You know, we've managed to get this far, I'm afraid I'm going to screw it up and have to rip out quilting.

And you know I hate to rip out quilting.

So.......
Quilt it in black?
Or quilt it in "natural" also known as vaguely off white?
Keep in mind that the sashing is all the black and tan dots.

Or quilt it in something else entirely? I'm open to that as well. Thanks!!

Thursday, May 13, 2010

Dollar store centerpiece!

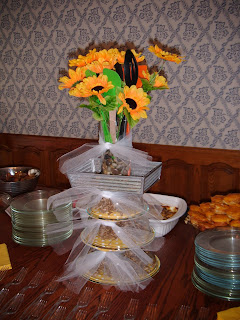
So I hosted a shower at my home last weekend. And I just hate buying flowers to use as a centerpiece! So I came up with something else instead. But I wanted something with some height in the middle of the table, and the bride was using sunflowers as inspiration for her colors.

I estimated that I'd spend about $30 on flowers. And I'd prefer to use that money toward something that could be used again, preferably by the bride.
I found these things on her registry that I thought I could use well, and I had a coupon at bed bath and beyond for 20% off my purchase. 3 nesting pyrex bowls, a drawer organizer and some kitchen utensils. I was really hoping that there would be a vase or utensil organizer on her registry, but no such luck. So....
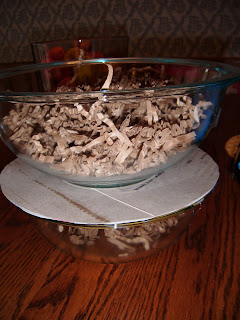
...I bought these at the dollar store. The green and orange spatulas just caught my eye... the vase was for the sunflowers and kitchen utensils, and the white tulle was in the bridal section and seemed useful! And rocks. Can't go wrong with rocks. And some kraft paper shreds was to fill my pyrex.
Stuff I had on hand: scrapbook paper, hot glue. some cardboard and some paper plates.

So I wanted to stack the pyrex bowls upside down on top of each other and fill the space in them somehow. This required me to create a base for them.

For the bottom one (the largest one) I just traced around the bowl on some scrapbook paper and stuck kraft paper shreds inside and the scrapbook paper on the bottom of the bowl. It's easier to do this if you put them together and then flip the whole thing over onto the table!

For the middle one, I took a Froot Loops box out of the recycling and flattened it and traced 2 circles to match the middle pyrex bowl. Then I glued them together and scrapbook paper on top.
For the smallest bowl, I had a paper plate the appropriate size (lucky me, since I started this project exactly 41 minutes before the start of the shower...) so all I had to do was cover it in scrapbook paper. If you are doing this, I strongly recommend trimming the paper after the gluing part!

After stacking the shred-filled pyrex, I glued the drawer organizer on top, then glued the vase in place. I put rocks in the drawer organizer and vase, then stuck the utensils and flowers in the vase. and tied some tulle bows down the tower. I would have liked to do larger bows, but it turns out there's not a whole lot of tulle on a dollar store spool. Next time I'll buy 2 of those!
And here's the best part.
When the shower was over, we disassembled the whole thing.
The hot glue peeled off everything easily,
and the beautiful bride had some kitchen items off her registry to enjoy.

power of a handmade gift....

Friends, I'm posting someone else's work tonight.
This is a shot of my kitchen.
Thrilling, right?
The flowers on the table are from my daughter's dance recital.
{she was a circus pony. it was darling. she didn't dance, though. but I digress....}
But if you look on the right, you'll see something that has been in every house my husband and I have lived in....
Here's the closeup. It was a wedding gift. It's been on my wall 12 years now.
It's huge!
I can only imagine how long it took Karin to cross-stitch this for me.
{I have always admired cross-stitch. I have neither the concentration or eyesight for it.}

Anyway, I'm posting this because it's good to remember the power of a handmade gift. Especially to us crafty-folks!
And every morning when I see this, I think of Karin and my friends in college who loved me even when I was a bloomin' idiot.
Cause I was, most definitely.
But this reminds me that they liked me anyway.

Giveaway Day is coming....

If you want to participate, go here.

I've got some stuff to give away, so I'm pumped!

Tuesday, May 4, 2010

new sewing table!!

For years, I've been sewing on this:It's a TV stand that my sweet husband built a loooong time ago when we were in college. Quite a long time ago it ceased to hold the TV, so I took it as my sewing table. There's a couple of problems, though. There's no place for my legs. So they have to be sqoooshed to the side while I sew. Not ideal. And, the machine sits up really high. And so I desperately wanted something that was more desk-like that I could have my machine lowered so that the needle was at table-level.

We looked at the local quilting shop and discovered that the nice tables are out of our price range. So lovely, but I couldn't stomach paying over $1000 for a piece of sewing furniture.

I've been stalking craigslist for months.

Finally, my dear husband decided he'd build me something. He spoke about it with a friend at work who is a very good woodworker. And said friend mentioned that his elderly mom needed to get rid of a sewing table at her house. hmm. BUT.... The day before we went to look at it, we found out that we had to replace the gas line at our home we're selling. Among other things. Yikes! So I made up my mind to absolutely love whatever she had to sell.

She opened her garage and I saw THIS!
It's basically the same table I had been looking at... except the 1994 version.
It locks! It expands! It has a hydraulic lift so that my machine can do this when not in use:
It did have a broken hinge, but that's no big deal for hubby to fix.

Its owner was thrilled that he cabinet would be going somewhere to be used every single day. Turns out that she had really stopped sewing by machine so much; her eyesight was better suited to hand-sewing. And so she didn't need the big cabinet any more.

And while her son and my hubby loaded it up? She took me inside and showed me her quilts. TOTALLY AWESOME!! I wish I had a camera with me. Hers were all hand-quilted, and mostly hand sewn. Amazing. A real joy to see.